
First, I'd like to thank everybody that joined in on our hop, we appreciate that you took the time to play along, and hope you enjoyed it!
And now... for the winners...
The winner of our Summer Breeze kit is...
Step 6: Now for the fun part :) - lay out photos, flowers and other embellies and glue it all together.
Step 7: Now use a sponge and white gesso and "frost" all the embellies - flowers, leaves, vines and even the papers here and there. Great effect, huh?! (This step comes with a warning though, it's hard to stop the "frosting"!) Now I have also added my title and some cheesecloth inside the wreath. There - my page is finished!
Thank you for stopping by, I hope you've enjoyed Helena's tutorial, and that we've inspired you to Create Something Beautiful Today!
And now... for the winners...
The winner of our Summer Breeze kit is...
TeriP!
And this was Teri's comment during the hop: "Ok, subscribed and yes, I wanna say my proper ooohs and ahhhs over the kits cuz WOW! But can I please say that I loved seeing the button for Petfinder.com? I adopted my boy having found him on Petfinder! My first blog hop and i feel like i've met a kindred spirit! THANK YOU!"
The winner of the Tim Holtz Spring Distress Inks is...
Lillian Child!
This is what Lillian had to say: "Thank you so much for arranging this amazing blog hop. All of the DT artists had such beautiful projects and Donna's collection is so lovely. I just discovered Scraps of Darkness and am now a follower."
Ladies, please email me at info@scrapsofdarkness.com with your full name and address, and I'll send those prizes right out to you!
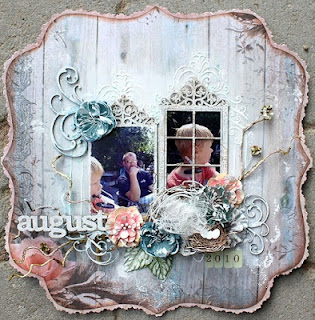
Helena Johansson has done a wonderful new tutorial on how to get a "frosted" look on your layouts, using Gesso and Modeling Paste.
She will show you how to get the beautiful frosted look she got on her latest Scraps of Elegance layout:

Step 1: Choose a background paper. I've chosen a beautiful paper from Donna Salazar, Elegant (such a perfect name!), and cut it using one of the Kaisercraft diecut papers as a template. The edge was cut from another Donna Salazar paper and for this I used a decorative scissors. I have also inked the edges of the Elegant paper with the Ingvild Bolme fluid edger.
 |
| Step 1 |
Step 2: Paint the paper with a thin layer gesso, using a sponge. This soften the background a bit, and makes your photos and embellies "pop".
 |
| Step 2 |
Step 3: Use a mask and modeling paste to give the background some texture.
 |
| Step 3 |
Step 4: Here I've used pan pastels, a light blue shade, to give the white paint some color. You can also use mist or ink.
 |
| Step 4 |
Step 5: Paint the grapevine wreath, included in the Country Charm embellie kit, with gesso.
 |
| Step 5 |
Step 6: Now for the fun part :) - lay out photos, flowers and other embellies and glue it all together.
 |
| Step 6 |
Step 7: Now use a sponge and white gesso and "frost" all the embellies - flowers, leaves, vines and even the papers here and there. Great effect, huh?! (This step comes with a warning though, it's hard to stop the "frosting"!) Now I have also added my title and some cheesecloth inside the wreath. There - my page is finished!
Thank you for stopping by, I hope you've enjoyed Helena's tutorial, and that we've inspired you to Create Something Beautiful Today!
Thank you SO MUCH for the blog hop prize. What a fun way to start my day. I do so appreciate your generosity.
ReplyDeleteAnd Helena's tutorial is just FABULOUS! Love using gesso and modeling paste!
Congratulations to the winners! Beautiful layout and tutorial! love the masking and texture!
ReplyDeleteCongrats Lillian, and Terri! Awesome tut Helena! That layout is gorgeous!
ReplyDeleteWoooohooo!!! Congrats Teri and Lillian!!!! Enjoy your goodies:))
ReplyDeleteChecked out Helena's tut and love it!! I love gesso and the frosted look! Going to have to give this a go for sure:)
♥Bev
thanks for the detail on this tut, i am really going to try this frosted look as well!!!
ReplyDeleteStunning layout! Perfectly elegant! I love the modeling paste technique! I have never used it, but I plan to ask soon as I buy some! Thank you so much for the amazing tutorial!
ReplyDelete